LS Hardware Station can be set to use a secure connection via HTTPS. It is highly recommended to do so as the connection will be encrypted, protected from being intercepted by a third-party.
To set Hardware Station to use HTTPS
- Navigate to the LS Hardware Station Management Portal.
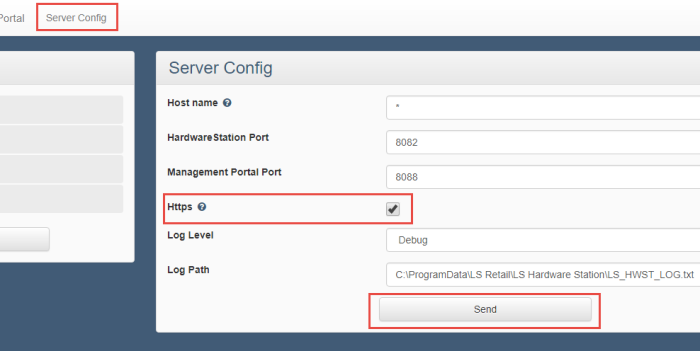
- In the Server Config section, select the Https check box and click Send.
- For the change to take effect, restart the LS Hardware Station service.
Note: When Hardware Station is hosted using HTTPS, the management portal will also use it. So to access the site, the address must now start with https. For example, instead of http://localhost:8088, use https://localhost:8088. Alternatively, navigate to http://localhost:8090 and you will be redirected to the correct protocol.
Certificates
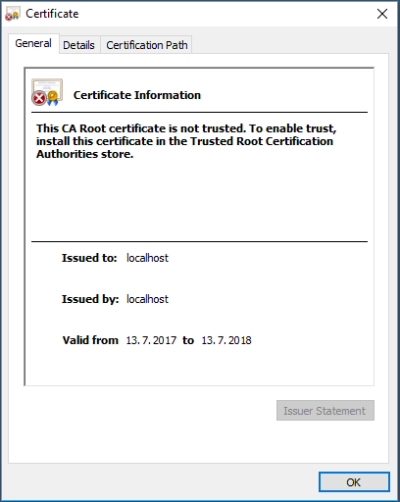
Connecting to LS Hardware Station via HTTPS requires an SSL certificate. The certificate is either issued by an SSL Certificate Authority or it is self-signed. It can be tricky to make modern browsers accept a self-signed certificate, as they do not know to trust the issuer (yourself). It is therefore highly recommended to use an authority signed certificate whenever possible.
Important: Use the below instructions at your own risk. The described methods are not bulletproof ways to bind SSL certificates but merely methods that have in some cases worked for us.
To use an authority-signed certificate
There are a few ways to install an SSL certificate. Here the IIS Manager is used:
- After launching the program, select Server Certificates.
- Click the Import… link on the Actions panel to the right.
- Browse to your certificate file; it will have a .pfx file extension. Certificate files are commonly password protected, but this is not a requirement. Certificate store should be set to Personal.
- After installing the certificate, select the new certificate and click View… on the Actions panel.
- In the Details tab of the window that opens up, locate the Thumbprint field and note down its value.
Note: Watch out if you are doing a copy-paste, because the value starts with an invisible character. To remove the invisible character, paste the value into Notepad, then move the cursor to the beginning of the thumbprint (by pressing the Home key), and press the Delete key on your keyboard once.
To bind the certificate
You must bind the newly installed certificate to the right IP address, port, and application. To do so, simply enter these two commands in a command prompt or a PowerShell terminal with administrator privileges:
netsh http add sslcert ipport="0.0.0.0:8082" certhash=xxx appid="{12345678-db90-4b66-8b01-88f7af2e36bf}"
netsh http add sslcert ipport="0.0.0.0:8088" certhash=xxx appid="{12345678-db90-4b66-8b01-88f7af2e36bf}"
Replace xxx with the certificate‘s thumbprint without spaces between the characters. The 0.0.0.0 value of ipport binds the certificate to any incoming IP address. Change this to a specific IP address, if desired.
The ports 8082 and 8088 belong to LS Hardware Station and LS Hardware Station Management Portal, respectively. If either of these ports have been changed at any point, then use the new values instead.
The appid is the ID of the server that hosts the Hardware Station, so this value should not be changed.
Host name
The certificate will always be issued to an address, sometimes with a wildcard (*) at the beginning. For example, the certificate may read: “issued to *.website.com“. The client using the Hardware Station must recognize the machine hosting it as being on that domain.
If this is not already the case, add the IP address and domain name of the Hardware Station to the host files of any client using it. You can find host files in C:\Windows\System32\drivers\....
To use a self-signed certificate
To create and bind a self-signed certificate to Hardware Station use the following script:
$IP = (Test-Connection -ComputerName (hostname) -Count 1 | Select IPV4Address).IPV4Address.IPAddressToString
$NewCert = New-SelfSignedCertificate -DnsName $IP -FriendlyName "LS HardwareStation"
netsh http add sslcert ipport="${IP}:8082" certhash=($NewCert.Thumbprint) appid="{12345678-db90-4b66-8b01-88f7af2e36bf}"
netsh http add sslcert ipport="${IP}:8088" certhash=($NewCert.Thumbprint) appid="{12345678-db90-4b66-8b01-88f7af2e36bf}"
The same applies to this script as the script used for binding the authority issued certificate: IP addresses, ports, and so on can be changed, if needed. Note: This script creates a certificate issued and bound to the IP address of the machine that ran it. This means that, unless changed, any client referencing it must use this exact IP address (no localhost or custom host names).
Certificate Manager
Since the server does not inherently trust a self-signed certificate, you must add it to the Certificate Manager:
- Start by opening the IIS Manager to see the newly created certificate.
- Follow the same basic steps that are described in the To use an authority-signed certificate section above, but ignore the import part.
- On the Details tab in the Certificate window, instead of noting the thumbprint, click Copy to File…, and export the certificate to a file using the Certificate Export Wizard.
- Open the Certificate Manager by pressing the Windows key and entering “certmgr.msc”.
-
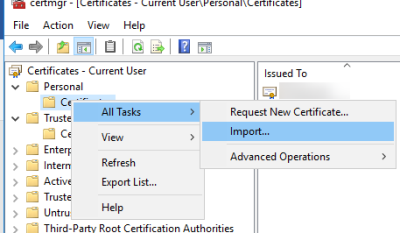
Add the exported certificate to the Personal and Trusted Root Certification Authorities folders by right-clicking and selecting All Tasks and Import….
Browser issues
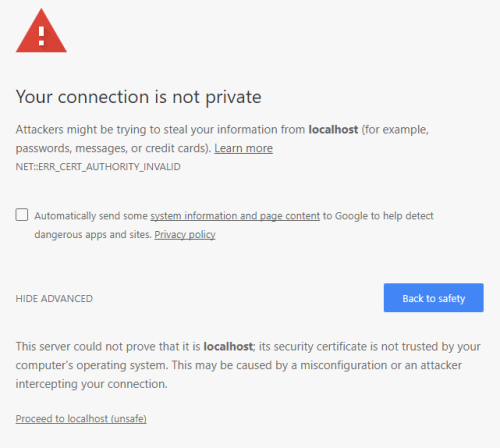
Modern browsers are not overly fond of self-signed certificates, even when classified as trusted. Google Chrome and Mozilla Firefox, for example, have their own ways of dealing with and importing self-signed certificates. Information about how to deal with this is easy to find on the internet. Therefore, browser-specific problems are not addressed in these instructions.
See Also
How to: Set Up LS Hardware Station
LS Hardware Station Troubleshooting